
DIFFICULTY RATING: MEDIUM
There are some lovely baby mobiles on the market, but a lot are super expensive. L suggested Mama B and I use some of my maternity leave to make Baby L's nursery mobile. I was apprehensive at first as my sewing skills leave a lot to be desired-! But Mama B sewed a lot at school and has never forgotten the essentials, plus her career was in teaching, so she taught me in a very easy-to-understand way (making the whole project much more enjoyable!).
I also found the process very therapeutic. I have one of those minds that tends to wander off during TV watching - especially with so much baby stuff flying around my head these days! Opening up my sewing kit and stitching in front of the telly really relaxed me. It was also a nice project to enjoy making with my mum - something we can give to Baby L and keep in the family.
We copied the design of this pretty version below from Etsy, which I found on Pinterest:
ORIGINAL PIN:
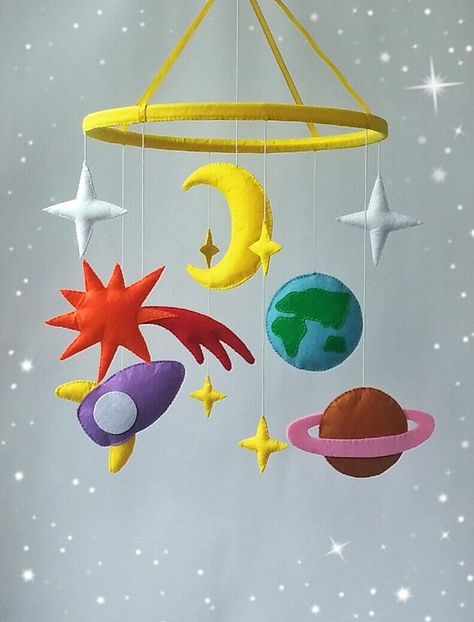
OUR ATTEMPT:

SHOPPING LIST
- Felt (enough for the amount you want to make - remember you need double as you're stitching two pieces together)
- Embroidery thread (we used some in similar colours to the felt, others slightly brighter to stand out)
- Needle
- Polyester filling
- Wooden skewer (it'll make sense in a minute)
- Circular embroidery frame
- Transparent decor crafting thread
- Ribbon
- Fabric glue
- Fabric scissors
- Pins
- Printer / paper / card
- Pritt stick
- Sequins if you want to add extra sparkle.
HOW-TO
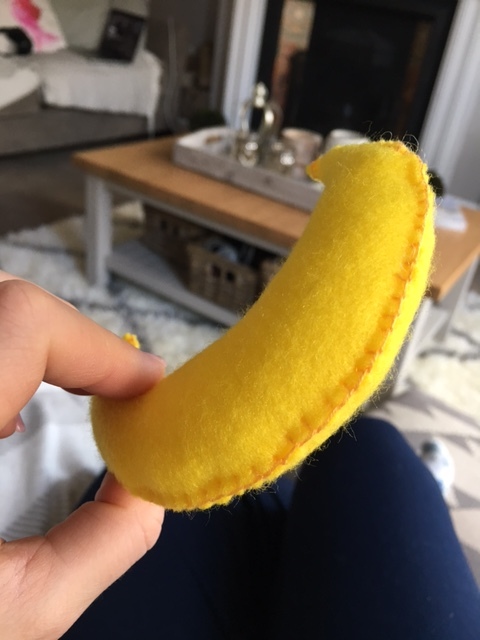
- Start by printing out your templates, ensuring their sizing is similar. We made the moon slightly bigger as it's the centre feature. We used Google image search for our templates.

- Cut out your first template and stick it to card. Cut out and you have your first template. (Make sure any sharp edges are rounded rather than pointed otherwise it proves tricky when trying to stitch.)

- Fold over a square of felt and pin the template to it.

- Cut around template with fabric scissors.
- Remove template and start blanket stitching around the edge. Rather than attempting to describe this method, I'd recommend taking a look at some YouTube videos - this one was particularly helpful:
(Video tutorial via)

- Stuff your felt with polyester filling as you finish a section. Make sure you put enough in there to pad the shape out. We used the blunt end of a wooden cooking skewer to reach the more narrow parts.

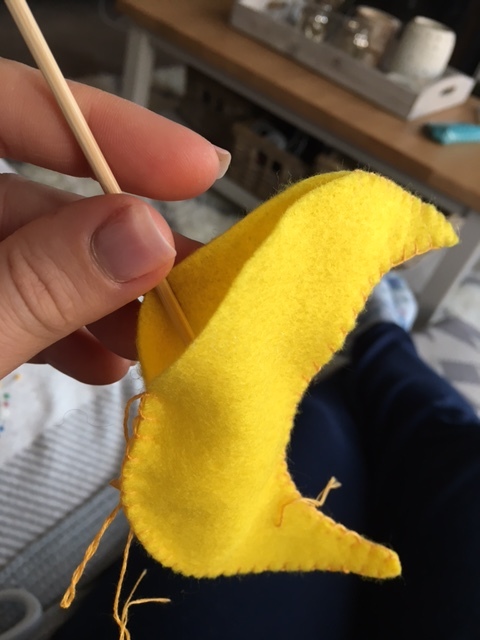
- Once you're happy with the stuffing, close off your stitch.

- Once all shapes are complete, sew your transparent decor crafting thread to your shapes and fix to the hoop, ensuring everything is balanced and secure. We tied ribbon around the hoop as this allowed us to sew the thread to the ribbon so it was extra secure.
- Hang your hoop via bright ribbon.
- And, you're done!
TOP TIPS
- Make sure everything is fitted securely and is 100% baby-safe
- Practice casting off, blanket stitching and finishing stitches on a spare bit of felt beforehand
- Stuff a good amount of polyester filling to give each piece shape, but don't stuff too hard with the skewer as you can damage the stitches
- We wrapped yellow ribbon around the hoop, which not only added extra colour but allowed us to sew the transparent thread to the hoop, making it extra secure
- Find a hook to hang your mobile while you attach each piece, so you can see how each piece fits and balances together before securing
- We stitched a star underneath the centre moon to fill a gap, which worked really well
- Keep an eye on the two sections of felt you're stitching as you go, to ensure they're aligned
- The embroidery thread we had was made up of 6 strands, so we separated it into three to make sewing easier and the stitches less bulky
- We used fabric glue to attach the green felt to the Earth design - make sure this is completely secure
- We added sequins to Saturn to break up the yellow and add a bit of space sparkle
- Only sew when you have time - you can really tell when sewing has been rushed (this makes a great maternity leave, evening or weekend project)
- Bolder colours are better for your baby's development (apparently!) so have fun with the colour scheme! High contrast black and white is also beneficial for babies' visual development, according to experts.
VERDICT
The sewing itself is really fun, especially when you get more confident. However, sewing the transparent thread to the hoop at the end is the tricky / fiddly part. Don't do this when you're in a rush - it requires time, patience and another person's set of eyes who can direct the sewer in terms of how high / low each piece falls and where on the hoop each fits.
For more nursery decor ideas, take a look at my Nursery board on Pinterest.
YOU MIGHT ALSO LIKE...